Batch Job Submission
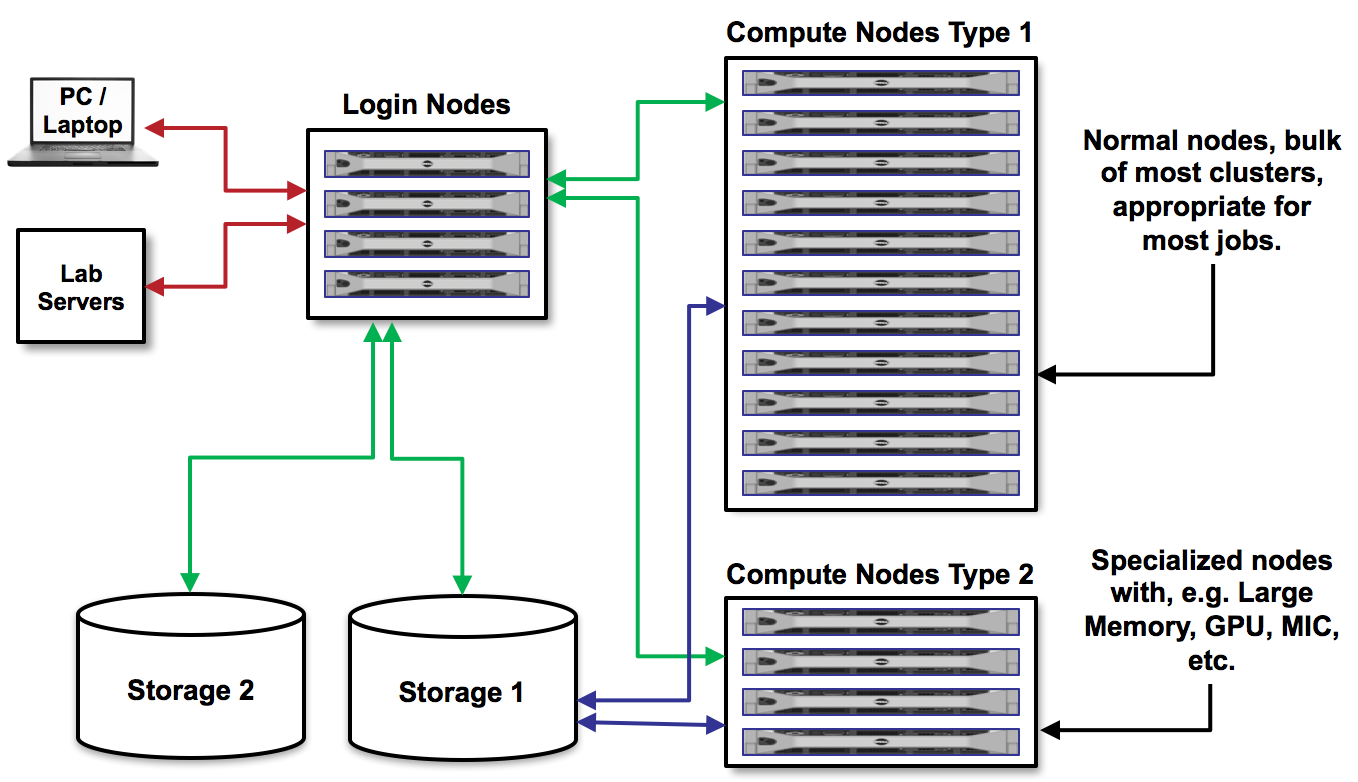
As we discussed before, on Lonestar5 there are login nodes and compute nodes.
We cannot run the applications we need for our research on the login nodes because they require too many resources and will interrupt the work of others. Instead, we must write a short text file containing a list of the resources we need, and containing the command(s) for running the application. Then, we submit that text file to a queue to run on compute nodes. This process is called batch job submission.
There are several queues available on Lonestar5. It is important to understand the queue limitations, and pick a queue that is appropriate for your job. Documentation can be found here. Today, we will be using the development queue which has a max runtime of 2 hours, and users can only submit one job at a time.
First, navigate to the Lab04 directory where we have an example job script prepared, called job.slurm:
$ cd
$ cd IntroToLinuxHPC/Lab04
$ cat job.slurm

#!/bin/bash
#----------------------------------------------------
# Example SLURM job script to run MPI applications on
# TACCs Stampede system.
#----------------------------------------------------
#SBATCH -J               # Job name
#SBATCH -o               # Name of stdout output file (%j expands to jobId)
#SBATCH -p               # Queue name
#SBATCH -N               # Total number of nodes requested (16 cores/node)
#SBATCH -n               # Total number of mpi tasks requested
#SBATCH -t               # Run time (hh:mm:ss)
#SBATCH -A               # <-- Allocation name to charge job against

# Everything below here should be Linux commands
First, we must know an application we want to run, and a research question we want to ask. This generally comes from your own research. For this example, we want to use the application called autodock_vina to check how well a small molecule ligand fits within a protein binding site. All the data required for this job is in a subdirectory called data:
$ pwd
/home1/03439/wallen/IntroToLinuxHPC/Lab04
$ ls
data  job.slurm  results
$ ls data/
configuration_file.txt  ligand.pdbqt  protein.pdbqt
$ ls results/
     # nothing here yet
Next, we need to fill out job.slurm to request the necessary resources. I have some experience with autodock_vina, so I can reasonably predict how much we will need. When running your first jobs with your applications, it will take some trial and error, and reading online documentation, to get a feel for how many resources you should use. Open job.slurm with VIM and fill out the following information:
#SBATCH -J vina_job      # Job name
#SBATCH -o vina_job.o%j  # Name of stdout output file (%j expands to jobId)
#SBATCH -p development   # Queue name
#SBATCH -N 1             # Total number of nodes requested (16 cores/node)
#SBATCH -n 1             # Total number of mpi tasks requested
#SBATCH -t 00:10:00      # Run time (hh:mm:ss)
#SBATCH -A CTLS2017      # <-- Allocation name to charge job against
Now, we need to provide instructions to the compute node on how to run autodock_vina. This information would come from the autodock_vina instruction manual. Continue editing job.slurm with VIM, and add this to the bottom:
# Everything below here should be Linux commands

echo "starting at:"
date

module list
module load autodock_vina
module list

cd data/
vina --config configuration_file.txt --out ../results/output_ligands.pdbqt

echo "ending at:"
date
The way this job is configured, it will print a starting date and time, load the appropriate modules, run autodock_vina, write output to the results/ directory, then print the ending date and time. Keep an eye on the results/ directory for output. Once you have filled in the job description, save and quit the file. Submit the job to the queue using the sbatch command`:
$ sbatch job.slurm
To view the jobs you have currently in the queue, use the showq command:
$ showq -u
$ showq      # shows all jobs by all users
If for any reason you need to cancel a job, use the scancel command with the 6- or 7-digit jobid:
$ scancel jobid
For more example scripts, see this directory on Lonestar5:
$ ls /share/doc/slurm/
If everything went well, you should have an output file named something similar to vina_job.o864828 in the same directory as the job.slurm script. And, in the results/ directory, you should have some output:
$ more
$ cat vina_job.o864828
    # closely examine output

$ ls results
output_ligands.pdbqt
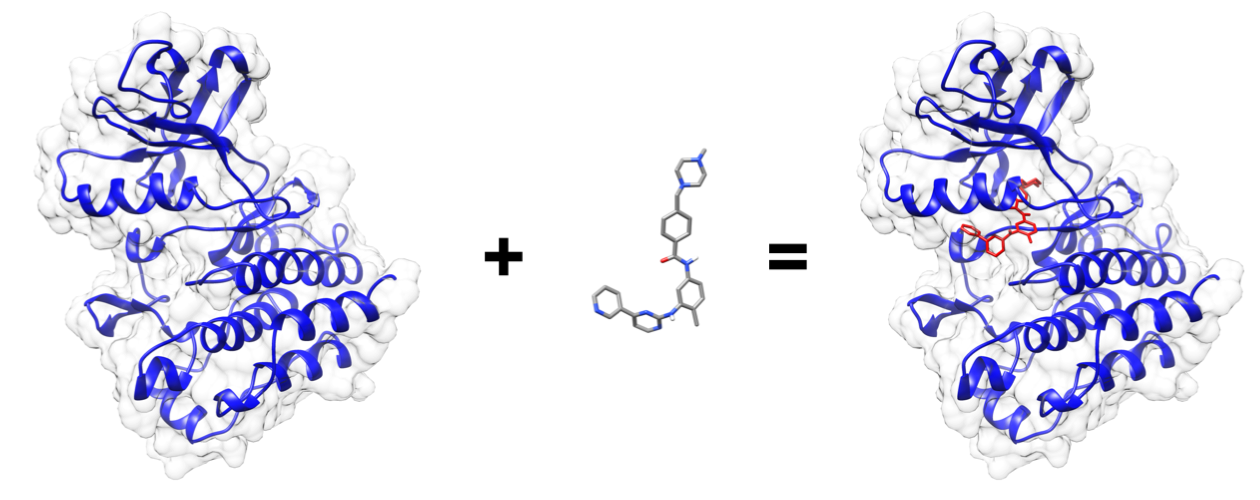
(Output visualized in UCSF Chimera)
Congratulations! You ran a batch job on Lonestar5!
Other Considerations:
Read the documentation.
- Learn node schematics, limitations, file systems, rules
- Learn about the scheduler, queues, policies
- Determine the right resource for the job
- Practice, practice, practice.
HPC systems are shared resources. Your jobs and activity on a cluster, if mismanaged, can affect others. TACC staff are always available to help.
Review of Topics Covered
| Command | Effect |
|---|---|
sbatch job.slurm |
submit batch job called “job.slurm” |
showq |
show all running and queued jobs |
showq -u |
show all running and queued jobs by this user |
scancel jobid |
cancel a job with id “jobid” |
idev --help |
show idev help text for running interactive jobs |
| Previous: The .bashrc | Top: Course Overview |